From the very beginning, one of the focus areas for XD has been sharing, or the ability to share your completed (or in-progress) designs with clients, developers, and the world at large. But while sharing to the web has been a highly touted feature— and rightly so — I wanted to highlight one of the other ways of sharing: exporting production assets for developers.
If you’re looking at anything beyond simple ideation, you’ll want to have this workflow nailed down. But, as you’ll find out later in this blog post, thinking about your export process should happen before you even begin working in XD, as you’ll need to make some critical decisions before you even create your first artboard.
What does “designed at” mean, anyway?
Most designers know that they need to provide assets at multiple sizes in order for their designs to look crisp in the final product, due to the fact that different devices have different pixel densities and screen sizes. For web, this generally results in two images, one at twice the size of the other. iOS demands three, and Android has a variety of sizes that it labels without numbers.
This leads to the fundamental question: what do you design at? Taking the simpler case of web, you could either design at the larger size and scale down to the smaller size on export, or you could design at the smaller size and then scale up on export. Or, to rephrase, you have the option to design at 2x (larger) and export a 1x version (smaller), or you could design at 1x and export to 2x.
1x vs. 2x. Do you go from left to right or right to left?
When the product team did our research, we were hoping for a clear answer as to what designers preferred. The answers we got were anything but definitive, and we came to the conclusion that the choice was highly personal. I’ll get more into the reasons behind this choice in the last section of this article.
For Adobe XD, we created an export system that would allow you to have the flexibility to export the sizes you need, no matter how you choose to design. By default, we set “designed at” 1x. If you use our default artboard sizes and accept the default when exporting, you should get the correct export sizes.
Exporting for Web
If you’re exporting for web, you’ll want to decide whether you’re designing at the smaller size (and want to export the larger) or the other way around. If you designed at the smaller size, set “designed at” to 1x and export to get the smaller one the same size as your artboard, and the larger one at 2x the size as your artboard.
If you only have vector artwork, like an icon, you might want to consider using SVG, which is a web vector format that will look crisp at all scales. However, there are limitations: if you want text to be exactly as you see it on your screen (like for a logo), you should either convert the text to a path or export to bitmap instead. Otherwise, you’re relying on your user having the font on their machine or device. And, of course, if you have to support really old browsers (like IE8), you might want to stay with bitmaps instead of vector assets.
Exporting for iOS
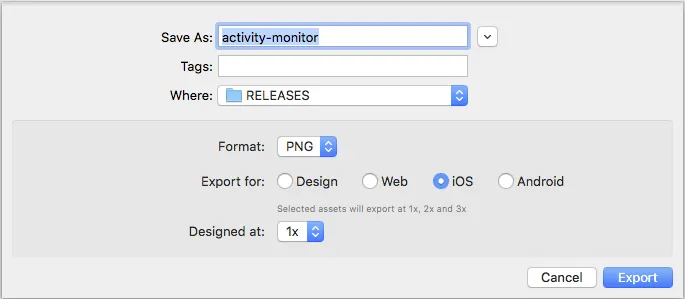
The Mac export dialog
iOS has three export sizes. Our default artboard sizes for various iOS devices assume that you are designing at 1x, so if you’ve used the defaults, leave your export at 1x.
If, however, you decide to double the width and height of your artboard, you would set “designed at” to 2x. You would then get a version that is half the size of your artwork in XD (1x) and then another version that is 1.5 the size of your artwork on canvas (or 3x the size of your 1x version).
Similar to web, there’s a vector format you can use for iOS; Xcode, the iOS developer surface, accepts PDFs for elements like icons. That being said, Xcode generates PNGs anyway based on this vector artwork.
Exporting for Android
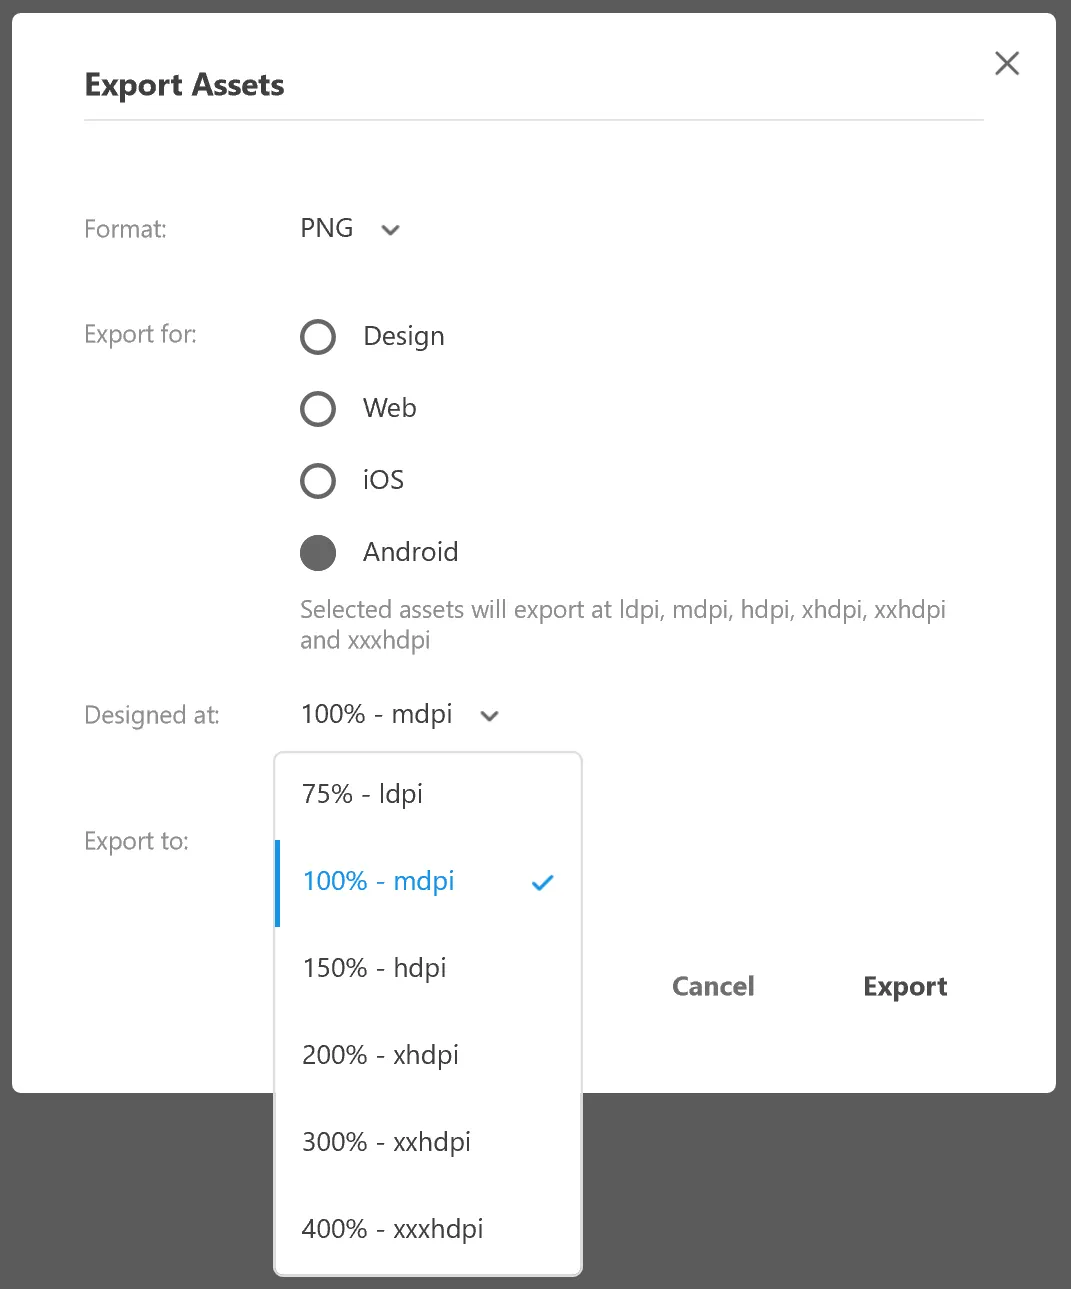
Export dialog for Windows, with the dropdown showing the options for Android.
Android has a number of different export variants for its platforms, which range from ldpi to xxxhdpi. We help you try to understand relative scale by using percentages in the drop-down. Just remember that 100% is the equivalent of 1x, and the rest should be relatively easy to figure out.
The unfortunate thing is that Android does not have a fully vector-based solution as of yet; my research shows that as of today, just over 60% of all Android devices support a vector-based format (Vector Drawable). This format is slightly different than SVG, so your developer will need to change the format to be able to use any vector artwork exported from XD. If you’re required to support devices running an Android version earlier than Lollipop, you’re probably better off simply exporting the images.
Exporting for Design
We introduced this mode for those people who simply wanted exactly what they see on the screen and don’t need a ton of images. If you just want 1:1, select “Export for Design,” and you’ll only get one set of assets. This is great for sharing concepts and individual artboards.
So, what should you design at?
This is the section where I’m going to discuss the trade offs you’ll need to make if you design at smaller or larger sizes. Let’s once again take the web scenario, where you only have 1x (smaller) or 2x (larger).
If you’re designing at 1x, you need to pay attention to bitmap images in your designs (like hero images). If you import a hero image the same width as your artboard, it’s likely to look pixelated or blurry when you export, because XD has to double each pixel in two directions. However, if you just drop in a huge bitmap each time you need an image, you’ll end up with huge files, including a cost at file save and load.
The solution to this is something called preflighting — editing your bitmap to be the maximum size you need before you import into XD. In the case of a web hero image, if your image spans the entire width of a 1920 x 1080 artboard, you’ll want to ensure that your image is exactly 3840 pixels across.
If you’re designing for iOS, and designing at 1x, you’ll want to make sure that you bring your images at 3x, and for Android, 400% (or 4x).
What about designing at the larger size, though? In this case, you’ll be worrying about your vector artwork. You have to ensure that every one of your lines and shapes can be displayed properly at each export size if you’re exporting bitmap images like PNG. If you have a line that has a width of 1, XD has to guess if it displays when you take export at a third or a quarter of the size.
If you don’t want your vectors to be fuzzy on export to bitmap due to anti-aliasing, you’ll need to ensure that all your border widths correspond correctly to the export sizes, but you won’t need to worry about your bitmap sizes, because scaling an image down is always more accurate than scaling up. And of course, your vectors will remain crisp if you export as SVG.
That’s it! Remember: you can export a single object, an artboard, or all artboards (just click on the pasteboard). Now that you understand what the “designed at” option means, you’ll be able to export your assets with confidence!
Want to see more of this type of content? Tap the heart below and let me know on Twitter! You can also leave a comment for me here.